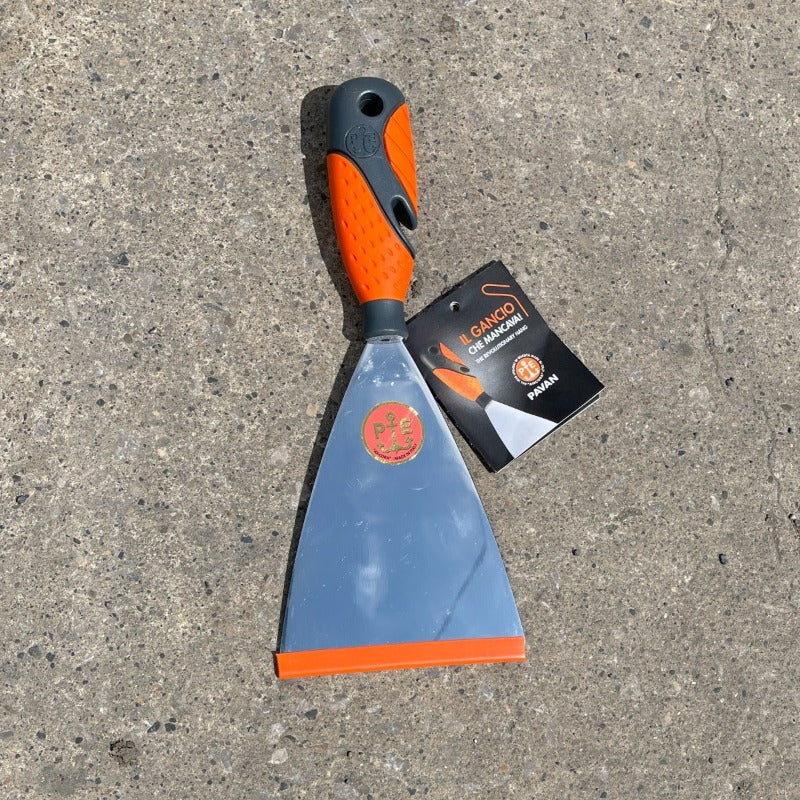
Pavan Spatula 80mm
Pavan Spatula 80mm

Pavan Spatula 80mm

Regular price£14.49
/
Tax included.

Pavan 80mm Spatula.

High quality stainless steel, Inox rounded corner blade, pre ground and polished edge.

80mm blade, with a soft touch rubber handle for comfort and grip, complete with a slotted section for hanging on bucket edge.

These are ideal for finishing and polishing small areas.

Full set of spatulas available at a 10% discount.

A must have for your tool collection.

Typically all orders are shipped out with APC next day service except weekends.

This site is protected by reCAPTCHA and the Google Privacy Policy and Terms of Service apply.

MARMORINO APPLICATION GUIDE

A guide for Marmorino Polished Venetian Plaster Application.

Tools Required:

Stainless steel Venetian plaster trowels: A range of sizes will be useful (small, medium, and large).
Plastic trowel or float: For initial smoothing and texture creation (if desired).
Sandpaper: Fine-grit, such as 400 or 600, for rounding trowel edges and any minor surface corrections.
Buckets and cleaning tools.
Clean cloths or sponges
Painter's tape: This is used to protect edges and trim.
Protective gear: Gloves and mask (if sanding creates dust).

Application Process:

1. Surface Preparation

Cure Time: Let your newly plastered walls cure for the recommended duration (consult plaster manufacturer's instructions). This is crucial for a stable base.
Priming: Apply a suitable primer designed for Venetian plaster. This will create a uniform surface and enhance adhesion. Let the primer dry thoroughly.

2. Base Coat

Trowel Application: Using a large stainless steel trowel, apply a thin, even coat of Marmorino across the entire wall. For best results, hold the trowel at a shallow angle (about 15-30 degrees).
Drying: Let this base coat dry fully. Drying times vary, so refer to the product's information.

3. Second Coat

Random Strokes: Apply the second coat in a similar manner to the first, but instead of aiming for perfect uniformity, use varied, slightly overlapping trowel strokes at different angles. This is how the classic, marbled look of Venetian plaster begins to emerge.
Drying: Again, allow this layer to dry thoroughly.

4. Subsequent Coats (Optional)

Thin Layers: More coats (usually up to three) can be applied, each one thinner than the last, using varying trowel strokes to increase depth and visual interest.
Drying Between Coats: Ensure each coat is fully dry before applying the next.

5. Burnishing/Polishing

Timing: Once the final coat is partially dry but still slightly pliable, begin burnishing.
Trowel Pressure: Press firmly with a clean stainless steel trowel in short, overlapping strokes at varying angles. This compresses the plaster, creating the characteristic polished sheen.
Intensify Gloss: Continue burnishing in overlapping sweeps to increase the level of polish as desired.

6. Sealing (Optional)

Protection: A coat of wax or dedicated Venetian plaster sealer can be applied for added water resistance and durability, especially in high-traffic or moisture-prone areas.
Follow the sealer's application instructions.
Important Tips:

Practice: If you're new to Venetian plastering, practice on a spare board first to perfect your technique.
Working in Sections: Tackle smaller sections of the wall at a time. This prevents the plaster from drying too quickly before you can work it.
Temperature and Humidity: Ideal conditions are moderate temperatures and humidity. Avoid applying in direct sunlight or extreme temperatures.

Clean as you go: Prevent dried plaster from building up on your tools by cleaning them frequently.

You may also like


Recently viewed